Pages

Friday, October 24, 2014

DIY Ninja Costumes...

Halloween is here and the boys couldn't be more excited! It was decided months ago that they would be ninjas this year and after much deliberation on colour options and symbols, we have finished our costumes!
Andrew is a big fan of the Lego show "Ninjago" and is adamant that he is dressed as the character Jay. I was happy he wasn't too particular about the specifics, because my plan for for the costume was pretty simple.
The photo shoot of the finished costumes didn't go exactly as I had imagined. I think I would have had more luck photographing two jumping fleas... but I guess that's what happens when you put two little boys in ninja costumes!
I picked up the black tights and and shirts for the ninja costumes at Target. I found them both in the girls department... don't tell Andrew! The masks are ski masks that I ordered from Amazon which should come in handy once we return to Canada.

To make the ninja smocks I folded a piece of fabric in half and lined up one of the boys t-shirts along the top fold. Using the t-shirt as a guide I cut the shape below making the top about one inch wider than the shoulders of the shirt. I used the neck of the t-shirt as a guide for the triangular neckline. At this point, I ironed, pinned and sewed a simple seam along the outside of the entire smock as well as around the neckline. 

To make the belt, I cut a band of fabric that was approximately 3' by 8" in dimensions. I folded it in half and ironed along the fold. Then opened the strip and folded each long edge into the middle fold. After ironing the length of the band I folded the entire thing in half (along the original crease) tucked in the ends and sewed along the perimeter to make a belt. This belt was then sewn to the back of the smock. 


Using my Silhouette and the Silhouette Fabric Interfacing, I cut out a dragon and added one to the front of the smock, sewing around the outside.


To make the boy's Nun Chucks I cut pieces of pipe insulation, glued a short length of plastic chain to the inside and wrapped the handles in duct tape. 

I'm happy to have checked this job off of my To Do list... who knows, we may have another little ninja to add to the pack before October 31st!

Thursday, October 16, 2014

Cake Batter Pumpkin Spice Squares

Here is a quick and easy dessert recipe to celebrate fall. It has the quintessential pumpkin spice flavour of the season and is topped with melted white chocolate. 


Ingredients
1 box of vanilla cake mix
1 Tbsp pumpkin pie spice
1/4 C pureed pumpkin
1/4 C table cream
1/4 C milk
1 egg
1/2 C of white chocolate chips
1 tsp vegetable oil

Empty cake mix into a large bowl and sift together with pumpkin pie spice. Add pumpkin puree, cream, milk and egg and stir until the mixture is smooth. Pour batter into a greased 8x8 cake dish/pan and bake at 350°F for approximately 40 min. The squares are finished when the edges are golden and crispy and the middle is still quite soft (they will harden as they set). Once the squares have cooled (in pan) for about 20 minute you can prepare the chocolate drizzle. In a small  glass bowl slowly melt white chocolate chips in microwave or over a double boiler, stirring regularly. Once melted it may be necessary to add a small amount of vegetable oil to thin the chocolate. The chocolate is the right consistency when you are able to drizzle it from a spoon in a thin stream. Add as much white chocolate drizzle as you would like and continue to cool in the pan until the chocolate has hardened. 


Thursday, October 9, 2014

A Bassinet Cover Tutorial

I am happy to say that I finally got around to completing a little project that I have been planning for quite some time... a Bassinet Cover for the baby's bassinet. Baby Girl will be using the bassinet that goes along with our Uppa Baby stroller for her main sleeping quarters for the first few months and I just wasn't thrilled with the way the bright shiny red fabric looked with the coral and grey colour scheme I was putting together for her little corner of our master bedroom.


I wasn't exactly sure how I was going to make this bassinet cover. I knew that I wanted to use two fabrics and that I would need to fit them over top of the existing bassinet canopy. I didn't really measure as I went, but sort of just went with it... I hope this is still a helpful guide if you're interested in creating something similar!


I started by removing the fabric from the bassinet. It basically consists of two fabric panels, and two fabric strips that attach the panels to the frame. I traced both the front and the back panel, leaving a small flap of fabric on the front panel that would tuck under the space that opens for a handle.  Once I had cut the two panels, I pinned them (right sides together) and sewed along the middle. You can see in the picture below that the two panels fit nicely over the original bassinet hood. 


Next, I folded and ironed the section of fabric that would tuck under the handle. To make the bands of fabric that would attach the cover to the upright frame, I cut two strips of fabric, 20 cm wide and about 10 cm longer than necessary. I finished one end of each strip with a seam, pinned and sewed them along the front panel on either side of the handle flap. 


I cut a third strip of fabric that would wrap along the bottom edge of the back panel. I finished one end of this strip with a seam, lined it up with the front panel fabric strip and pinned it in place. It was necessary to do this while the bassinet cover was on the bassinet. I secured this back fabric strip by sewing along the entire length of the strip. Once the front and back fabric strips were in place I finished their outer edges with a simple seam. With the bassinet cover in place, I neatly pinned, tucked and sewed the two fabric strips so that they would look tidy once wrapped under the upright frame. 


With all seams and edges tidied up, I used some adhesive velcro circles to attach the front fabric strip to the underside of the bassinet hood. This way it can easily be removed when traveling or out for a walk.


This project turned out to be pretty simple, albeit not overly easy to explain. I hope it made a bit of sense!


I am happy with the way the Bassinet Cover adds a softer appearance to the bassinet and works with the colour scheme of the "Shared Nursery". Let's hope the new addition likes this bed enough to actually do a bit of sleeping in it!

Thursday, October 2, 2014

A dresser/change table for Baby Girl!! {brimnes hack}

The count down is on! Baby Girl Leeper is due to arrive in the next 5 weeks and I have a number of little projects in the works to keep me busy during this arduous final month of pregnancy! First on the list is establishing a little space for baby to call her own. At this point the boys are in their own bedrooms, and since we plan to keep baby in our room for the first few months we thought it better to leave well enough alone and leave Henry in his crib until we were ready for Baby Girl to have her own room. So, we've shuffled our bedroom furniture and made a bit of space for a bassinet, rocking chair and dresser/change table.


We brought in the Ikea Brimnes dresser that we had been using in Henry's room, added a change pad and the Grundtal wall organizer which fits diapers. wipes and other necessities perfectly. 


To add a bit of a girly touch, I hung three framed prints (also from Ikea!). I wanted to incorporate some of the fabric I had picked up for the space and thought that adding it behind the top drawer glass would not only look cute, but hide the contents of the drawer. 


This was an extremely simple job. I cut a piece of Elmer's Foam Board to fit the inside of the drawer, cut a piece of fabric to wrap around the board and hot glued it around the perimeter of the back of the board. To secure the board in the drawer I added a tiny dab of hot glue to the top corners. 


I absolutely love this fabric and think it adds a nice touch to the dresser. I plan to add it and some coordinating fabrics to a few other areas in the room! Hope to share those projects soon!


Thursday, September 18, 2014

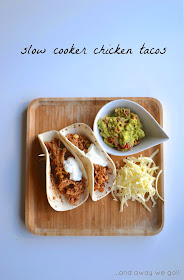
slow cooker chicken tacos

Now that the days are cooler and our routine is busier, I have pulled out the old slow cooker and started to add a few soups and casseroles to our weekly menu. These slow cooker chicken tacos have been an old stand by in our house for a few years and I was excited to make them again the other night!

chicken tacos

The recipe is just what I think every slow cooker recipe should be; toss the ingredients in the pot and turn it on! The mixture of chicken, beans and corn makes for a filling meal, packed with protein. 

chicken tacos

I've made this dish for guests and taken it to parties and have always had lots of requests for the recipe...

So here it is!

Slow Cooker Chicken Tacos

1 can of black beans (drained and rinsed)
1 large jar of chunky salsa
2 large chicken breasts (bone and skin removed)
2-3 Tbsp taco seasoning 
1 cup frozen corn


Add black beans and salsa to slow cooker. Place the chicken breasts on top of the mixture and sprinkle with taco seasoning. 

Cook on low for 8 hours or high for 5 hours.  

Remove chicken breasts and shred with a fork. Return shredded chicken to the slow cooker, add frozen corn and mix together with black beans and sauce. Turn the slow cooker to low and cook for a half an hour. 

Serve with soft tortillas and top with shredded cheese, sour cream and guacamole.

chicken tacos

chicken tacos


Tuesday, September 16, 2014

Morning Routine for Preschoolers

Now that Andrew is attending school 5 days a week, I decided it was time for him to start taking more responsibility for his morning routine. He's been doing most morning tasks on his own for the last six months or so, but needs constant reminders and repeated requests to get the jobs done. I wanted to create an easy checklist for him that wouldn't require any maintenance (erasing check marks or reprinting) and that would be easy for him to manipulate on his own. A quick Pinterest search put a number of "morning routine" options at my fingertips and I selected and adapted the one that I thought would work best for us.


To make this Morning Routine Flip Chart, I cut a file folder that I had on hand. Then, using my Silhouette and some adhesive vinyl, I cut out some simple images for the tasks Andrew needs to complete as well as some check marks and a morning message. I added a small piece of magnet to each flap and covered each magnet with some of the orange vinyl (just because it looked better!).


I kept the morning routine tasks very simple; potty, brush teeth, put p.j.'s in the laundry basket and get dressed. I've also started setting out his outfits for the week in a hanging shoe organizer like this. I have not labeled the days of the week, which gives him some choice in what he will wear each day. 


This morning routine has worked better than I imagined it would! Andrew took to the flip chart right away and has stuck with it for a few weeks now! I'm hopeful that the novelty of the chart doesn't wear off, because it will be worth it's weight in gold once baby #3 arrives in November!!

Sharing...

Thursday, September 11, 2014

Back to school...

This week Andrew ventured back to the Nature School at Irvine for his second year. He was really excited to see his friends and teachers and had no problem at all saying goodbye to Henry and I... a little different than our first day last year. The Nature School at Irvine has been a wonderful place for Andrew. Their day is split between a traditional classroom and the trails of the centre. They approach a traditional curriculum through nature, teaching the eager little learners to respect and love the natural world. As a teacher, I find it incredibly inspiring. Rob and I have been talking a lot about the "Top 10" list of what we will miss when we move back to Canada, and I know this community will be high on the list!


To show our appreciation (in advance) to Andrew's teachers and Education Assistants, we personalized some cute notebooks I found at Target. Using my Silhouette, I cut a banner for each notebook, tied on fun pen and tucked in a little note from Andrew. They were very happy with the gesture!


Looking forward to great year of learning!

Monday, September 8, 2014

Henry is TWO!!

It's been a few weeks since we celebrated Henry's second birthday, but I didn't want to let this big day pass without sharing a few photos of the little guy in all of his glory! Here he is with his new guitar, the two are pretty much inseparable!


Henry continues to be the eternal charmer. His quirky little personality is so ridiculously infectious that it may not be possible to look at him for more than a minute without cracking a smile. He delights in making others laugh and is coming up with new ways to do so all the time. He was born to be the middle child... easy to please and impossible to ignore!


Henry and Andrew have really hit a new stride in their relationship over the past few months. Watching the two of them develop this relationship, tenuous as it may be, is hands down my favourite part of being their Mom.


This kid is absolutely incredible. 
Happy Birthday Little Man!
xxx