Last September, I shared the car seat cover that I made for Henry, in this post. I have been pleasantly surprised at how much traffic it continues to receive. At that point, I was just becoming familiar with the tutorial aspect of blogging, so I didn't try to attempt one for a project with so many steps. However, I am much more comfortable with these posts now… so I snapped a bunch of photos while I was making a cover for my friend Shannon and her beautiful baby girl, Ayla!
Here is the step-by-step process...
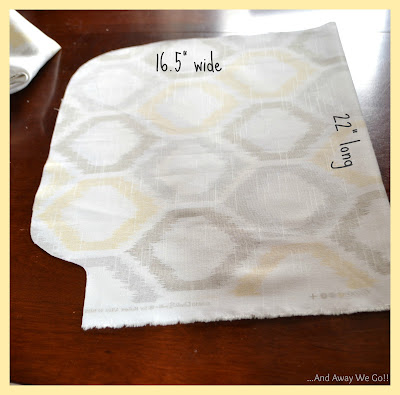
To make the front panel of the cover, fold your fabric in half and roughly sketch and then cut this shape. It should be 16.5" wide (from fold) and 22" long. You will want to ensure that these dimensions work for your car seat, as they are all a bit different.
I chose to add a strip of a coordinating fabric to the front of the cover. To do this I removed a 5" strip from the front panel and replaced it with the coordinate. I cut the yellow fabric 6" wide for a seam allowance. Once I had sewn the strip on both sides, I ironed the seams flat.
I used the front panel as a guide to trace and cut the back portion of the cover. For most car seats this piece should be slightly smaller than the front piece, but again, all carseats are different.
I sewed the front panel to the back panel and ironed the seam flat. Then, placing the cover right side down, I traced and cut the underside of the cover.
Keeping the fabric right side together, I sewed around the perimeter of the cover, leaving a 3" opening to turn it right side out. After turning the cover right side out, I ironed the seams, taking special care to fold the raw edge of the opening in.
To make the straps, cut two pieces of fabric 9.5" by 11".
Fold and iron this piece of fabric length wise (you want the strap to be 9" long). Open it back up and fold each edge into the crease in the middle and iron. Then fold the ends in and sew a raw seam, so that the strap will be nicely finished at both ends. This is where I made a slight change from the first cover that I made. Instead of velcro, I wanted to use snaps. I attached these before I closed the strap, with a finishing stitch, so that the there would be no visible stitching around the snaps.
Pin the straps to the seam on the top of the cover, and ensure that they are in an appropriate location by attaching the cover to your carseat. You will want to make sure that you can still easily carry the car seat without having to move the cover. Once you have found the correct location, sew the strap directly onto the cover with two lines of stitching (one on each side of the seam). Snap your cover to your car seat and you are ready to go!!
I was so excited to give this gift to Shannon and Ayla. The colours go well with her car seat, and even her nursery;) Ayla was really pumped to try it out... don't let her expression fool you!!
Linking Up
The Taylor House - Pinterest Power Party
In Designer Jeans - Stop, Look & Link Party


Great job and I love the fabric! I'll keep this in mind for gifts!
ReplyDeleteThis is a great cover!! Thanks for sharing the how to instructions!
ReplyDeleteLove this cover....the colors and patterns are perfect! I NEED to learn how to sew!!!!!
ReplyDelete