Monday, April 29, 2013

Mother's Day Sharpie Mug

Happy Monday everyone! Today I am over at The Taylor House sharing a fun Mother's Day craft. This Sharpie Mug is quick, inexpensive and great for all ages! I hope you check out the "How To" here.

Sharpie Mug

Friday, April 26, 2013

DIY Stroller Toy Bar


baby stroller

Henry recently graduated from his bucket car seat to the kind that stays in the car, meaning that it was time to pull out the "Big Boy Stroller Seat". We have the Uppa Baby Stroller system and have absolutely loved it. It has travelled with us everywhere and been extremely versatile. However, I had forgotten about Andrew's obsession with chewing on the bar that crosses over the seat, that is until Henry started doing the same thing! The bar was looking completely gross, and after digging a bunch of little black pieces of foam from is mouth and I knew I needed a solution!


I decided to sew a cover for the bar that would work for attaching a few toys. I started by measuring two pieces of fabric that were long enough to cover the bar and wide enough to wrap around, adding an inch to the width for a seam allowance. I placed the two pieces right side together and sewed around the perimeter, leaving a small opening to turn it right side out. To close the opening, I tucked the raw edge in and added a finishing stitch to the end. I did this on the other end as well, just for the sake of symmetry.


Then, I folded the cover in half and pinned the edges together. To add the ribbon loops for attaching toys, I cut three pieces of ribbon, folded them in half and tucked the looped end inside of the folded cover. I pinned these in place and sewed along the length of the cover, making one long tube. 


I then turned the whole cover right side out and was done! This tube fit snugly over the stroller seat bar and completely covered the mess from Andrew's teeth!

baby stroller

baby stroller

They toys attached easily and now he won't be able to toss them from the stroller! I think this idea would work for quite a few strollers. It took about twenty minutes to sew and was made from scraps material... gotta love a free project!

baby stroller


Thursday, April 25, 2013

*#%* my three year old says...

Yesterday, while the boys were sleeping, I was enjoying one of my favourite maternity leave luxuries... watching Ellen with a cup of tea. Andrew woke up and wandered in from his nap. He pointed to the T.V. and said in a groggy voice...

"Mommy, she was the one who cut my hair last time!"

I immediately cracked up, and texted the story to my cousin Lynsey, who is also our favourite hair stylist!

Hmmm, I guess to a three year old there would be some similarities!


Tuesday, April 23, 2013

Homemade Granola


homemade granola

Granola really is the perfect snack. I love it with milk, fresh berries and yogurt or even just on it's own. We seem to go through quite a bit in our house, and since it's not too cheap, I thought I'd look up a few recipes and see if I couldn't make some in bulk. I found that most recipes had the same basic ingredients and that they were all super adaptable, making it easy to work with what you have in your pantry. We are big fans of cinnamon and vanilla, so I added added both to the recipe. I also included some pumpkin seeds because I love their texture!

homemade granola

Honey & Almond Granola

7 cups of rolled oats
1 cup sweetened coconut flakes
3/4 cup sliced almonds
1/2 cup hulled and roasted pumpkin seeds
1 tsp. cinnamon
3/4 cup canola oil
1 cup brown sugar
1/2 cup honey
1/2 tsp salt
1 T vanilla

Combine oats, coconut, almonds, pumpkin seeds and cinnamon in a large mixing bowl and stir well. Measure the remaining ingredients into a saucepan and stir over medium heat until sugar has dissolved. Slowly pour over dry ingredients and mix well. Spread mixture out over two cookie sheets and bake in a 325 degree oven for twenty minutes. Be sure to stir the mixture once or twice while baking. The granola is done when the oats become a golden brown (they will not necessarily be crunchy until they cool). 

homemade granola

This recipe for homemade granola is fantastic! It is sweet and crunchy and the clusters are just the right size! It is also very economical... by my calculations about 1/3 the price of a store bought box!

I Heart Nap Time

Saturday, April 20, 2013

Earth Day Projects For Kids

earth day ideas for kids


Monday April, 22nd is Earth Day! I wanted to share the Earth Day craft that Andrew and I made today, as well as a few other great ideas that I found on the web. I know that as a teacher, I was always searching at the last minute for an Earth Day activity to use with my class, so I hope these ideas help!

Andrew and I made this Earth Day craft by sponge painting a cardboard circle with blue paint. We then used green plasticine to make the continents and some red for a heart! It was a quick and easy activity, and he enjoyed playing with the clay!

earth day ideas for kids

Here are some other great Earth Day projects for all ages!

earth day ideas for kids

earth day ideas for kids

earth day ideas for kids

earth day ideas for kids

My favourite children's story to read on Earth Day has always been The Lorax, by Dr. Seuss. The message is so fitting, and the pictures are fabulous! Here is a great idea for making Seuss inspired garden out of recycled materials. 

earth day ideas for kids


Happy Earth Day!!

Friday, April 19, 2013

Ladybug Paper Craft

Hi everyone! I just wanted to let you know that I am over at The Taylor House today sharing a fun springtime craft!  I hope you take a second to check it out!

Wednesday, April 17, 2013

My Favourite Baby Items...

Yesterday I did a little happy dance when my doorbell rang in the middle of the afternoon. I had been tracking a delivery since late last week, and I knew that my new diaper bag had finally arrived! The boys watched, in confusion, as their Mother giddily tore the box open and proceeded to excitedly explore all of the glorious pouches and compartments. I spent at least a half hour packing and repacking my new bag with all of my everyday items... it was the highlight of my day!

Anyway, the excitement of the new diaper bag got me me thinking about some of my other favourite baby items and I thought I would round up some pictures and links and share them with you!

First and foremost, you probably want to see the bag that had me so pumped up... Look at all of those compartments! One of the side pouches is even insulated to keep food/bottles chilled. I love that the main portion of the bag zipps shut, but that the four outer pockets remain open for quick access to keys, phones or toys.

Lassig Diaper Bag

One of my favourite items in my diaper bag, is the JJ Cole Diaper Pod. It holds wipes, a few diapers, diaper cream, and comes with a change pad. It is perfect to quickly grab from your bag, when you need to change your little one in a public washroom (there never is enough space on those change tables!)

diaper tote

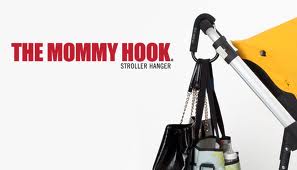
Another must have for us is the "Mommy Hook". Who would have thought that an oversized carabiner would be so popular amongst parents? We keep this attached to our stroller at all times. It's great for carrying shopping bags, your purse, the diaper pod (for quick access to wipes) and even soggy bathing suits at the beach!


The Halo Sleepsack is another item that we would not be able to get by without. Experts recommend that infants should not be put to bed with loose blankets. We originally thought this was a little paranoid, but after a scary, blanket wrapped around head, incident with Andrew, we are strong advocates for this policy.


The Mally Bib was an impulse by that really paid off! I fell in love with their fun designs, and picked one out for Andrew about three years ago. I felt a little guilty about spending $40 on a bib, but am I ever glad that I did! This bib has been used every single day, at every single meal, for three years straight. It fit Andrew throughout his toddler years, and has now been passed onto Henry. It wipes up easily, and never has to be machine washed... Love it!

Leather bib
Lastly, the Kushies Nursing Canopy has been an everyday favourite. They are very inexpensive ($8 each) compared to some of the other options, and they fold up nice and compact. What I really love is that they are made from the same fabric as the Kushies receiving blankets, so they are excellent for burping when baby is done!

nursing canopy
I know some, if not all, of these items are completely superfluous to caring for a baby... but they have made my life a little easier and they make some dirty jobs a little more pretty! What are your favourite  "must have" baby or kid items?


Monday, April 15, 2013

White Chocolate Cranberry Muffins


I think I have stumbled upon the secret ingredient that makes cafe muffins so much tastier than those I always make at home. It's really no surprise.... BUTTER! I make a lot of muffins, usually just simple recipes that generally come from the same "Muffins and More!" cook book that is straight out of my Mom's tangerine '80's kitchen (don't worry, she's updated her kitchen since the '80's), and they always call for vegetable oil or margarine. I've never used butter, and let me tell you, the results were great! The muffins maintain the crunchy exterior that usually disappears once they cool!

For this recipe I adapted the King Arthur Flour Chocolate Chip Muffin recipe. I wanted to use the white chocolate chips that I had left from the blondies I made last month. I swapped out the regular chocolate chips for white and dried cranberries, and used brown sugar rather than white. Here is the whole recipe:


  • 1/2 cup butter
  • 1 cup brown sugar
  • 2 teaspoons baking powder
  • 1/2 teaspoon salt
  • 1 teaspoon vanilla extract
  • 1/2 teaspoon cinnamon
  • 2 large eggs
  • 1/2 cup milk
  • 2 cups flour
  • 1 cup white chocolate chips
  • 1/2 cup dried cranberries
Preheat the oven to 350°F. Lightly grease muffin pan.
1) Beat together the butter, sugar, baking powder, salt, vanilla and cinnamon
2) Beat in the eggs, then stir in the milk.
3) Mix in the flour, then the chocolate chips and cranberries
4) Spoon the batter into the muffin cups
6) Bake the muffins for 30 minutes or until inserted toothpick comes out clean

Linking Up
The Taylor House - Pinterest Power Party
In Designer Jeans - Stop, Look & Link Party

Thursday, April 11, 2013

Car Seat Cover Tutorial

Car Seat Canopy

Last September, I shared the car seat cover that I made for Henry, in this post. I have been pleasantly surprised at how much traffic it continues to receive. At that point, I was just becoming familiar with the tutorial aspect of blogging, so I didn't try to attempt one for a project with so many steps. However, I am much more comfortable with these posts now… so I snapped a bunch of photos while I was making a cover for my friend Shannon and her beautiful baby girl, Ayla! 

Here is the step-by-step process...


Carseat cover tutorial

To make the front panel of the cover, fold your fabric in half and roughly sketch and then cut this shape. It should be 16.5" wide (from fold) and 22" long. You will want to ensure that these dimensions work for your car seat, as they are all a bit different. 


Carseat cover tutorial

I chose to add a strip of a coordinating fabric to the front of the cover. To do this I removed a 5" strip from the front panel and replaced it with the coordinate. I cut the yellow fabric 6" wide for a seam allowance. Once I had sewn the strip on both sides, I ironed the seams flat.


Carseat cover tutorial

I used the front panel as a guide to trace and cut the back portion of the cover. For most car seats this piece should be slightly smaller than the front piece, but again, all carseats are different.

Carseat cover tutorial

I sewed the front panel to the back panel and ironed the seam flat. Then, placing the cover right side down, I traced and cut the underside of the cover. 

Carseat cover tutorial

Keeping the fabric right side together, I sewed around the perimeter of the cover, leaving a 3" opening to turn it right side out. After turning the cover right side out, I ironed the seams, taking special care to fold the raw edge of the opening in.

Carseat cover tutorial

I then added a finishing stitch to the cover, and closed the opening, by sewing around the perimeter.


To make the straps, cut two pieces of fabric 9.5" by 11".


Fold and iron this piece of fabric length wise (you want the strap to be 9" long). Open it back up and fold each edge into the crease in the middle and iron. Then fold the ends in and sew a raw seam, so that the strap will be nicely finished at both ends. This is where I made a slight change from the first cover that I made. Instead of velcro, I wanted to use snaps. I attached these before I closed the strap, with a finishing stitch, so that the there would be no visible stitching around the snaps. 


Pin the straps to the seam on the top of the cover, and ensure that they are in an appropriate location by attaching the cover to your carseat. You will want to make sure that you can still easily carry the car seat without having to move the cover. Once you have found the correct location, sew the strap directly onto the cover with two lines of stitching (one on each side of the seam). Snap your cover to your car seat and you are ready to go!!


I was so excited to give this gift to Shannon and Ayla. The colours go well with her car seat, and even her nursery;) Ayla was really pumped to try it out... don't let her expression fool you!!


Linking Up
The Taylor House - Pinterest Power Party
In Designer Jeans - Stop, Look & Link Party

Tuesday, April 9, 2013

Office Supply DIY


I have always loved office supplies and am quite proud of my sticky note, Sharpie and page protector collection (you'd also be impressed if you saw them)! So, it is no surprise that I am drawn to fun ideas for embellishing these everyday, mundane objects.  Here is one of my most recent "office supply improvements" and five fun ideas from the web!